Do you Leave Detail on Your Table?
New filmmakers and colourists should make a necessary decision: Log or Rec.709? It is about making a choice that will impact the whole project. Should he/she take their shots in Raw (Log) vs Standard camera colour format (Rec.709)? There is no straight answer. Let’s dive in and learn about the pros and cons of both.
Rec.709 delivers a ready-to-broadcast look straight out of the camera footage. Log footage is where you can become a true magician. It’s the basic ingredient for preserving incredible shadow and highlight detail, giving you unparalleled flexibility in post-production.
If Rec.709 is like a ready-to-eat, ready-to-serve meal, which has nearly no scope for personalisation. On the other hand, Log is a gourmet chef’s ingredient – uncooked, but with endless possibilities for a culinary masterpiece, your masterpiece.
 In this guide, we’ll strip away the jargon and break down the technical differences, practical scenarios, and step-by-step workflow tips. By the end, you’ll know exactly when to embrace Log footage and how to unlock its maximum potential.
1. Rec.709/Standard Camera Settings: Your Go-To for Speed and Consistency
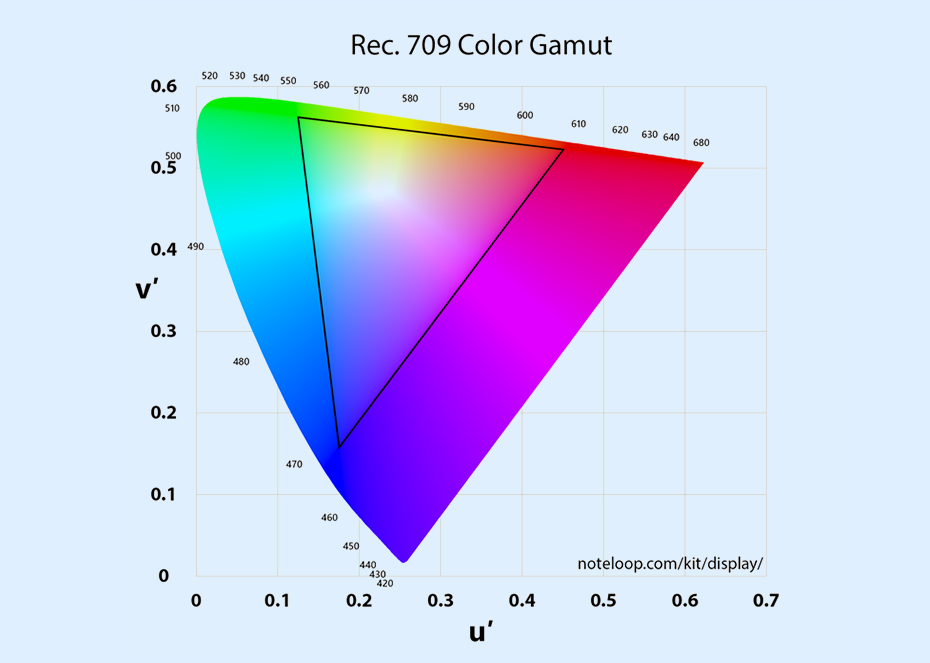
What is it? Rec.709 is the established standard for High Definition (HD) video delivery (these are built-in camera profiles, Vivid, Natural, etc). These profiles, or say your camera, define the colour space and gamma curve, ensuring your video looks consistent across most client displays.
Downsides:
- Limited Dynamic Range: Expect around 6-8 stops of dynamic range. What you see is pretty much what you get.
- “Mundane” Look: Contrast and saturation are applied in-camera, giving you a “finished” look right away. The contrast and saturation are going to be the same for people using a Sony, Canon or a Nikon camera. In the end, it is your camera manufacturer that decides the colour profile.
When Rec.709 Shines:
- Tight Deadlines: News, live events, or projects where you need to deliver yesterday.
- Instant Finished Results: Perfect for quick turnarounds! Since your footage is already coloured, you don’t have to spend time on it, and editing can be faster.
- Minimal Resources: Great for solo shooters or small crews without a dedicated colourist.
- Web Content: When consistent viewing on standard consumer monitors is paramount.
2. Log Footage: The Filmmaker’s Secret Weapon
Log (can be used interchangeably with Raw) profiles are (logarithmic) designed to capture your camera’s absolute maximum dynamic range – often 10+ stops! It does this by “flattening” the image, compressing highlights and lifting shadows.
The Basics:
- Why it is Flat & Desaturated: Yes, Raw Log footage is dull and washed out. The aim is to capture highlights, shadows, and other details, with the highest range of precision possible. The camera sensor focuses on getting the most out of the camera’s dynamic range. But it misses the colours. So, you have to colour grade the Log footage yourself during editing to get the colours back into the image.
- Rich Data Preservation: As discussed above, the format is a trade-off, and the flat look means it’s holding onto a high range of colour information in both the brightest highlights and darkest shadows.
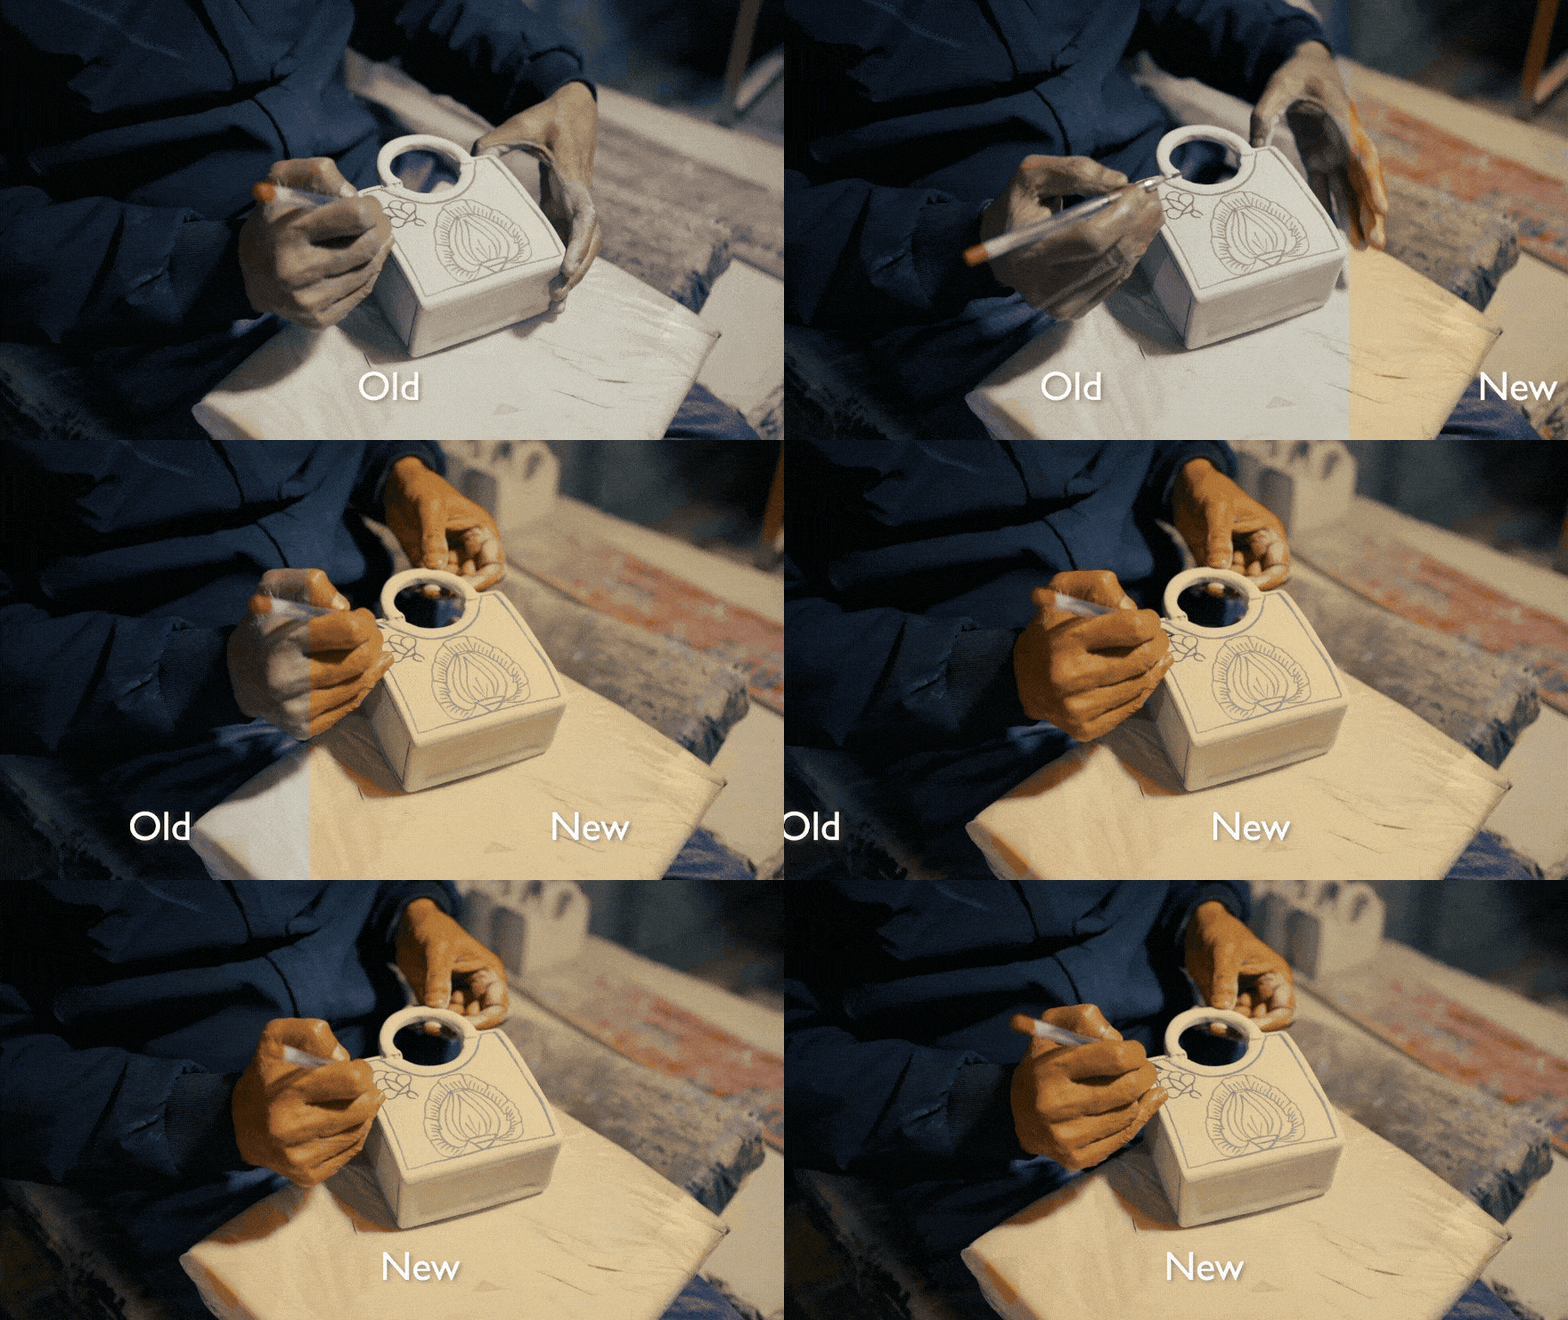
- Post-Production Powerhouse: The format requires an editor or a colourist (depending on the expertise and the budget) to colour grade the footage. The colour grading can give a new and unique look and feel. The changes will not look like a filter applied to the footage. Further, you can revisit and colour grade it again to a different style.
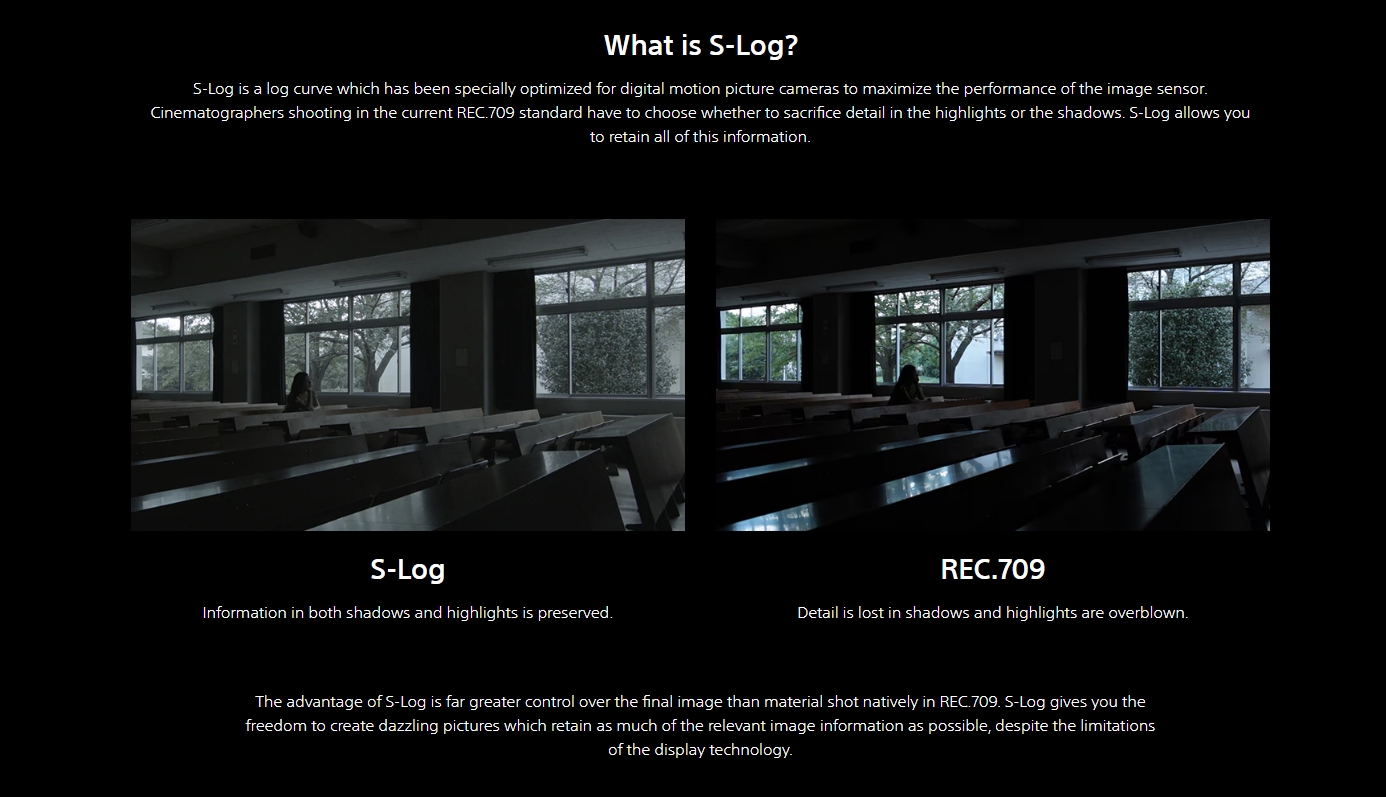
Credits – Sony (BrollBay uses S-Log to record Log)
Why Filmmakers Should Value Log:
- Unrivalled Flexibility: You can easily recover seemingly “blown out” highlights or pull detail from crushed shadows that Rec.709 would simply lose.
- Craft Unique Looks: The perfect canvas for creating a truly distinctive and cinematic feel with custom colour grading or LUTs.
- Handles High Contrast: Essential for capturing challenging scenes, such as sunsets, bright exteriors, or deep, moody interiors.
3. Log vs. Rec.709: A Quick Look
- Dynamic Range Limited (6–8 stops) Extended (10+ stops)
- Out-of-Camera Ready to use Flat—requires grading
- File Size/Bit Often 8-bit Commonly 10- or 12-bit
- Post-Production Minimal time Higher (grading & LUT application)
- Grading Freedom Low High
4. The Deciding Factors for Rec.709
Sometimes, the simplest path is the best. Choose Rec.709 when:
- You’re Against the Clock: Your project demands rapid delivery, and you can’t afford extensive grading. (You can still choose a readily available LUT for fast and simple grading)
- Resources Are Tight: You’re a one-person team or have a limited budget to hire a dedicated colourist.
- Broadcast is Key: Your content is strictly for broadcast standards or clients that expect a direct Rec.709 output.
5.The Deciding factor for Log
This is where your creative vision comes alive. Shoot in Log when:
- High-Contrast Scenes: You think dramatic sunsets, dazzling cityscapes, or scenes with deep shadows where Rec.. 709 would simply fail.
- Creative Goals: You’re working on narrative films, commercials, or branded content where a custom, polished colour grade elevates the storytelling. Think of a retro B&W look.
- Future-Proofing Your Project: Archival projects and documentaries benefit immensely. Log retains maximum image data, ensuring your footage can be re-graded beautifully years down the line as technology evolves.
6. Integrating Log into Your Workflow: A Simple Path
Creating Log footage is a simple process:
- Camera Setup:
-
- Select your camera’s specific Log profile (e.g., S-Log3, C-Log2, V-Log).
-
- Expose Smartly: Use zebras or a waveform monitor to expose skin tones around 40%-50% IRE. (Pro Tip: Often, a slight overexposure is your friend in Log!) Watch these videos for more.
- Apply a Technical LUT (First!):
-
- This is your foundational step. Apply the manufacturer’s “Log to Rec.709” LUT. This instantly normalises your contrast and colour, giving you a more accurate starting point. Or you can choose a different manufacturer like ARRI or BlackMagic, which is directly available in editing software.
- Primary Correction:
-
- Now, dial in your basics: adjust exposure, fine-tune white balance, and set your overall contrast.
- Creative Grading:
-
- This is where you sculpt your look! Apply a creative LUT you love, or dive into curves, colour wheels, and HSL controls to craft a unique aesthetic.
- Deliver in Rec.709:
-
- Before exporting, ensure your project is set to the Rec.709 colour space for consistent playback on web, broadcast, or digital cinema platforms.
7. Pro Tips for Mastering Log
- Monitor with a LUT: If your on-camera monitor supports LUTs, use it! This lets you preview a normalised image while shooting, helping you judge exposure and colour more accurately. Mirrorless Cameras like Sony support custom LUTs or colour profiles.
- Expose to the Right (ETTR): Slightly overexpose your Log footage (without clipping highlights, of course!). This pushes more information into the brighter, cleaner part of your sensor, resulting in better shadow detail and reduced noise.
- Try 10-bit or Higher: Whenever possible, record in 10-bit or 12-bit (8-bit is not bad either). This is where Log truly shines, providing the deep colour information needed for robust grading.
- Organise Your LUTs: Keep your “technical” LUTs (Log to Rec.709 conversions) separate from your “creative” LUTs. This streamlines your workflow and prevents confusion.
Conclusion: Empower Your Footage, Tell Better Stories
Whether you prioritise Rec.709’s efficiency or Log’s remarkable flexibility, understanding both formats empowers you to make the right choice for every project. The goal is always the same: to deliver the best possible image for your client, your audience, and your creative vision.
Try the power of Log? Download a free Log sample clip from Brollbay today! Experiment in your next colour grade and see the difference for yourself.
Explore our full range of professional Log footage bundles at brollbay.com.
New filmmakers and colourists should make a necessary decision: Log or Rec.709? It is about making a choice that will impact the whole project. Should he/she take their shots in Raw (Log) vs Standard camera colour format (Rec.709)? There is no straight answer. Let’s dive in and learn about the pros and cons of both.
Rec.709 delivers a ready-to-broadcast look straight out of the camera footage. Log footage is where you can become a true magician. It’s the basic ingredient for preserving incredible shadow and highlight detail, giving you unparalleled flexibility in post-production.
If Rec.709 is like a ready-to-eat, ready-to-serve meal, which has nearly no scope for personalisation. On the other hand, Log is a gourmet chef’s ingredient – uncooked, but with endless possibilities for a culinary masterpiece, your masterpiece.
 In this guide, we’ll strip away the jargon and break down the technical differences, practical scenarios, and step-by-step workflow tips. By the end, you’ll know exactly when to embrace Log footage and how to unlock its maximum potential.
1. Rec.709/Standard Camera Settings: Your Go-To for Speed and Consistency
What is it? Rec.709 is the established standard for High Definition (HD) video delivery (these are built-in camera profiles, Vivid, Natural, etc). These profiles, or say your camera, define the colour space and gamma curve, ensuring your video looks consistent across most client displays.
Downsides:
- Limited Dynamic Range: Expect around 6-8 stops of dynamic range. What you see is pretty much what you get.
- “Mundane” Look: Contrast and saturation are applied in-camera, giving you a “finished” look right away. The contrast and saturation are going to be the same for people using a Sony, Canon or a Nikon camera. In the end, it is your camera manufacturer that decides the colour profile.
When Rec.709 Shines:
- Tight Deadlines: News, live events, or projects where you need to deliver yesterday.
- Instant Finished Results: Perfect for quick turnarounds! Since your footage is already coloured, you don’t have to spend time on it, and editing can be faster.
- Minimal Resources: Great for solo shooters or small crews without a dedicated colourist.
- Web Content: When consistent viewing on standard consumer monitors is paramount.
2. Log Footage: The Filmmaker’s Secret Weapon
Log (can be used interchangeably with Raw) profiles are (logarithmic) designed to capture your camera’s absolute maximum dynamic range – often 10+ stops! It does this by “flattening” the image, compressing highlights and lifting shadows.
The Basics:
- Why it is Flat & Desaturated: Yes, Raw Log footage is dull and washed out. The aim is to capture highlights, shadows, and other details, with the highest range of precision possible. The camera sensor focuses on getting the most out of the camera’s dynamic range. But it misses the colours. So, you have to colour grade the Log footage yourself during editing to get the colours back into the image.
- Rich Data Preservation: As discussed above, the format is a trade-off, and the flat look means it’s holding onto a high range of colour information in both the brightest highlights and darkest shadows.
- Post-Production Powerhouse: The format requires an editor or a colourist (depending on the expertise and the budget) to colour grade the footage. The colour grading can give a new and unique look and feel. The changes will not look like a filter applied to the footage. Further, you can revisit and colour grade it again to a different style.

Credits – Sony (BrollBay uses S-Log to record Log)
Why Filmmakers Should Value Log:
- Unrivalled Flexibility: You can easily recover seemingly “blown out” highlights or pull detail from crushed shadows that Rec.709 would simply lose.
- Craft Unique Looks: The perfect canvas for creating a truly distinctive and cinematic feel with custom colour grading or LUTs.
- Handles High Contrast: Essential for capturing challenging scenes, such as sunsets, bright exteriors, or deep, moody interiors.
3. Log vs. Rec.709: A Quick Look
- Dynamic Range Limited (6–8 stops) Extended (10+ stops)
- Out-of-Camera Ready to use Flat—requires grading
- File Size/Bit Often 8-bit Commonly 10- or 12-bit
- Post-Production Minimal time Higher (grading & LUT application)
- Grading Freedom Low High
4. The Deciding Factors for Rec.709
Sometimes, the simplest path is the best. Choose Rec.709 when:
- You’re Against the Clock: Your project demands rapid delivery, and you can’t afford extensive grading. (You can still choose a readily available LUT for fast and simple grading)
- Resources Are Tight: You’re a one-person team or have a limited budget to hire a dedicated colourist.
- Broadcast is Key: Your content is strictly for broadcast standards or clients that expect a direct Rec.709 output.
5.The Deciding factor for Log
This is where your creative vision comes alive. Shoot in Log when:
- High-Contrast Scenes: You think dramatic sunsets, dazzling cityscapes, or scenes with deep shadows where Rec.. 709 would simply fail.
- Creative Goals: You’re working on narrative films, commercials, or branded content where a custom, polished colour grade elevates the storytelling. Think of a retro B&W look.
- Future-Proofing Your Project: Archival projects and documentaries benefit immensely. Log retains maximum image data, ensuring your footage can be re-graded beautifully years down the line as technology evolves.
6. Integrating Log into Your Workflow: A Simple Path
Creating Log footage is a simple process:
- Camera Setup:
-
- Select your camera’s specific Log profile (e.g., S-Log3, C-Log2, V-Log).
-
- Expose Smartly: Use zebras or a waveform monitor to expose skin tones around 40%-50% IRE. (Pro Tip: Often, a slight overexposure is your friend in Log!) Watch these videos for more.
- Apply a Technical LUT (First!):
-
- This is your foundational step. Apply the manufacturer’s “Log to Rec.709” LUT. This instantly normalises your contrast and colour, giving you a more accurate starting point. Or you can choose a different manufacturer like ARRI or BlackMagic, which is directly available in editing software.
- Primary Correction:
-
- Now, dial in your basics: adjust exposure, fine-tune white balance, and set your overall contrast.
- Creative Grading:
-
- This is where you sculpt your look! Apply a creative LUT you love, or dive into curves, colour wheels, and HSL controls to craft a unique aesthetic.
- Deliver in Rec.709:
-
- Before exporting, ensure your project is set to the Rec.709 colour space for consistent playback on web, broadcast, or digital cinema platforms.
7. Pro Tips for Mastering Log
- Monitor with a LUT: If your on-camera monitor supports LUTs, use it! This lets you preview a normalised image while shooting, helping you judge exposure and colour more accurately. Mirrorless Cameras like Sony support custom LUTs or colour profiles.
- Expose to the Right (ETTR): Slightly overexpose your Log footage (without clipping highlights, of course!). This pushes more information into the brighter, cleaner part of your sensor, resulting in better shadow detail and reduced noise.
- Try 10-bit or Higher: Whenever possible, record in 10-bit or 12-bit (8-bit is not bad either). This is where Log truly shines, providing the deep colour information needed for robust grading.
- Organise Your LUTs: Keep your “technical” LUTs (Log to Rec.709 conversions) separate from your “creative” LUTs. This streamlines your workflow and prevents confusion.
Conclusion: Empower Your Footage, Tell Better Stories
Whether you prioritise Rec.709’s efficiency or Log’s remarkable flexibility, understanding both formats empowers you to make the right choice for every project. The goal is always the same: to deliver the best possible image for your client, your audience, and your creative vision.
Try the power of Log? Download a free Log sample clip from Brollbay today! Experiment in your next colour grade and see the difference for yourself.
Explore our full range of professional Log footage bundles at brollbay.com.

The way everything is explained is amazing